首页
首页 阿豪运维笔记
memcached命令行
安装telnet服务
[root@172-11-1-3 /]# yum install telnet -y
测试
[root@172-11-1-3 /]# telnet 127.0.0.1 11211
Trying 127.0.0.1...
Connected to 127.0.0.1.
Escape character is '^]'.
存储方式(最后一个2表示你要写的数值是两位的)
set key2 0 30 2   存储一个数据
STORED显示这个表示已经存储成功.
get key2    查看数据
VALUE key2 0 2
12
Memcached语法规则
<command name> <key> <flags> <exptime> <bytes>\r\n <data block>\r\n
注:\r\n在windows下是Enter键
<command name> 可以是set, add, replace
set表示按照相应的<key>存储该数据,没有的时候增加,有的时候覆盖
add表示按照相应的<key>添加该数据,但是如果该<key>已经存在则会操作失败
replace表示按照相应的<key>替换数据,但是如果该<key>不存在则操作失败。
<key> 客户端需要保存数据的key
<flags> 是一个16位的无符号的整数(以十进制的方式表示)。该标志将和需要存储的数据一起存储,并在客户端get数据时返回。客户端可以将此标志用做特殊用途,此标志对服务器来说是不透明的。
<exptime> 为过期的时间。若为0表示存储的数据永远不过期(但可被服务器算法:LRU 等替换)。如果非0(unix时间或者距离此时的秒数),当过期后,服务器可以保证用户得不到该数据(以服务器时间为标准)。
<bytes> 需要存储的字节数,当用户希望存储空数据时<bytes>可以为0
<data block>需要存储的内容,输入完成后,最后客户端需要加上\r\n(直接点击Enter)作为结束标志
memcached数据导出和导入
导出
[root@172-11-1-3 ~]# memcached-tool 127.0.0.1:11211 dump > data.txt  //导出
Dumping memcache contents
  Number of buckets: 1
  Number of items  : 2
Dumping bucket 1 - 2 total items
导入
nc 127.0.0.1 11211 < data.txt
若nc命令不存在,yum install nc
注意:导出的数据是带有一个时间戳的,这个时间戳就是该条数据过期的时间点,如果当前时间已经超过该时间戳,那么是导入不进去的
php连接memcached
安装php的memcache扩展
安装php的memcache扩展
[root@localhost ~]# cd /usr/local/src/
[root@localhost ~]#  wget  http://down.ahaoyw.com/data/source/other/memcache-2.2.3.tgz
[root@localhost src]# tar zxf memcache-2.2.3.tgz
[root@localhost src]# cd memcache-2.2.3
[root@localhost memcache-2.2.3]# /usr/local/php-fpm/bin/phpize
报错
Cannot find autoconf. Please check your autoconf installation and the
$PHP_AUTOCONF environment variable. Then, rerun this script.
解决办法:# yum install autoconf -y
[root@localhost memcache-2.2.3]# ./configure --with-php-config=/usr/local/php-fpm/bin/php-config
[root@localhost memcache-2.2.3]# make && make install
安装完后会有类似这样的提示:Installing shared extensions:     /usr/local/php-fpm/lib/php/extensions/no-debug-non-zts-20131226/
修改下php.ini配置文件
[root@localhost memcache-2.2.3]# vi /usr/local/php-fpm/etc/php.ini
添加一行extension="memcache.so”

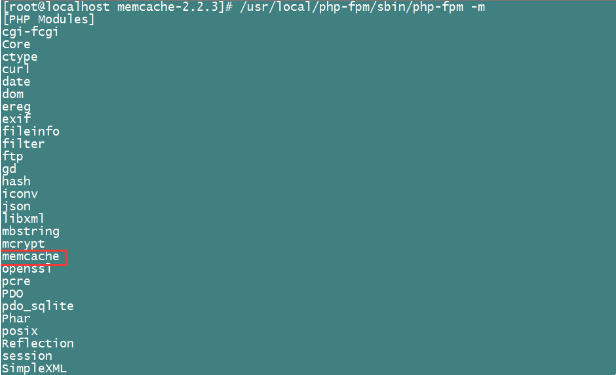
检查/usr/local/php/bin/php -m
测试
下载测试脚本
# curl www.apelearn.com/study_v2/.memcache.txt > 1.php 2>/dev/null
1.php内容也可以参考https://coding.net/u/aminglinux/p/yuanke_centos7/git/blob/master/21NOSQL/1.php
执行脚本
# /usr/local/php-fpm/bin/php 1.php
最终可以看到数据如下: