首页
首页 阿豪运维笔记
MySQL主从介绍
MySQL主从又叫做Replication、AB复制。简单讲就是A和B两台机器做主从后,在A上写数据,另外一台B也会跟着写数据,两者数据实时同步的=
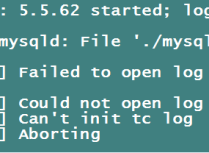
MySQL主从是基于binlog的,主上须开启binlog才能进行主从。
主从过程大致有3个步骤
1)主将更改操作记录到binlog里
2)从将主的binlog事件(sql语句)同步到从本机上并记录在relaylog里
3)从根据relaylog里面的sql语句按顺序执行
主上有一个log dump线程,用来和从的I/O线程传递binlog
从上有两个线程,其中I/O线程用来同步主的binlog并生成relaylog,另外一个SQL线程用来把relaylog里面的sql语句落地

主从一般用在备份数据(备用),读写分离
准备工作
1. 准备AB两台机器都安装好mysql,mysql安装详情请查看如下链接。
安装mysql步骤
# wget http://mirrors.sohu.com/mysql/MySQL-5.1/mysql-5.1.73-linux-x86_64-glibc23.tar.gz  //下载mysql
# tar -zxvf mysql-5.1.73-linux-x86_64-glibc23.tar.gz   //解压
# mv mysql-5.1.73-linux-x86_64-glibc23 /usr/local/mysql  //移动目录到usr/local并且改名为mysql
# cd /usr/local/mysql/  //进入mysql目录
#useradd mysql   //创建mysql独立运行用户
# mkdir -p /data/   //创建数据库库文件存放目录
#yum install -y libaio
#./scripts/mysql_install_db --user=mysql --datadir=/data/mysql   //初始化
#  cp support-files/my-large.cnf /etc/my.cnf  //拷贝配置文件
因为系统在/etc/目录下会有一个默认的my.cnf这个时候我们需要把他改名
# mv /etc/my.cnf /etc/my.cnf.bak
#cp support-files/mysql.server /etc/init.d/mysqld   拷贝启动文件脚本到/etc/init.d目录下
#vi /etc/init.d/mysqld 编译下他
basedir=/usr/local/mysql
datadir=/data/mysql
定义下刚才设置的mysql安装目录和数据库库存放路径
#chmod 775 /etc/init.d/mysqld   设置启动脚本权限
# chkconfig --add mysqld   加入开机启动
# echo "PATH=$PATH:/usr/local/mysql/bin" >> /etc/profile
# source  /etc/profile    //立即生效
#最后启动下mysql
[root@monitoring mysql]# /etc/init.d/mysqld start
Starting MySQL.. SUCCESS!
配置主
修改my.cnf,增加server-id=5和log_bin=ahao01
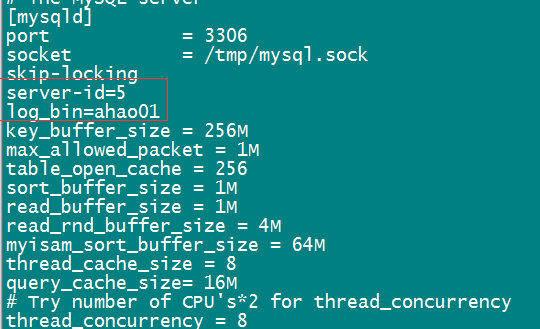
由于新安装的my.cnf里面会默认定义#log-bin=mysql-bin 和server-id=1 则需要把他注销
# /etc/init.d/mysqld restart //重启服务
# echo "PATH=$PATH:/usr/local/mysql/bin" >> /etc/profile
# source /etc/profile //立即生效
#mysqladmin -uroot password '密码' 设置mysql密码
把mysql库备份并恢复成aming库,作为测试数据
mysqldump -uroot mysql > /tmp/mysql.sql
# mysql -uroot -p -e "create database ahao"
# mysql -uroot -p ahao< /tmp/mysql.sql
创建用作同步数据的用户
mysql> grant replication slave on *.* to 'repl'@slave_ip identified by '密码';
其中slave_ip 为从的ip
mysql> flush tables with read lock; 锁表
查看master的状态
mysql> show master status;    //查看master的状态,
+--------------------+----------+--------------+------------------+
| File               | Position | Binlog_Do_DB | Binlog_Ignore_DB |
+--------------------+----------+--------------+------------------+
|  ahao01.000001|   106|              |                  |
+--------------------+----------+--------------+------------------+
1 row in set (0.00 sec)
记住 File| Position这些数据是要记录的,一会在slave端用到。
配置从
查看my.cnf,配置server-id=6,要求和主不一样 修改完配置文件后,
由于新安装的my.cnf里面会默认定义#log-bin=mysql-bin 和server-id=1 则需要把他注销
# /etc/init.d/mysqld restart重启mysqld服务
可以先创建ahao 库,然后把主上的/tmp/mysql.sql拷贝到从上,然后导入ahao 库
mysql> create database ahao //创建库
mysql> source /root/mysql.sql //还原数据库
设置从服务器开始读取的主服务器日志位置
mysql> stop slave; //关闭同步
mysql> change master to master_host='172.18.133.81', master_user='repl', master_password='密码', master_log_file='ahao01.000001', master_log_pos= 106;
mysql> start slave; //启用同步
查看主从是否配置成功
mysql> show slave status\G     //查看主从是否配置成功
*************************** 1. row ***************************
               Slave_IO_State: Waiting for master to send event
                  Master_Host: 172.18.133.81
                  Master_User: repl
                  Master_Port: 3306
                Connect_Retry: 60
              Master_Log_File: ahao01.000001
          Read_Master_Log_Pos: 106
               Relay_Log_File: iZwz99t7wntliazleekryeZ-relay-bin.000002
                Relay_Log_Pos: 248
        Relay_Master_Log_File: ahao01.000001
             Slave_IO_Running: Yes
            Slave_SQL_Running: Yes
              Replicate_Do_DB:
          Replicate_Ignore_DB:
           Replicate_Do_Table:
       Replicate_Ignore_Table:
      Replicate_Wild_Do_Table:
  Replicate_Wild_Ignore_Table:
                   Last_Errno: 0
                   Last_Error:
                 Skip_Counter: 0
          Exec_Master_Log_Pos: 106
              Relay_Log_Space: 421
              Until_Condition: None
               Until_Log_File:
                Until_Log_Pos: 0
           Master_SSL_Allowed: No
           Master_SSL_CA_File:
           Master_SSL_CA_Path:
              Master_SSL_Cert:
            Master_SSL_Cipher:
               Master_SSL_Key:
        Seconds_Behind_Master: 0   //为主从延迟的时间
Master_SSL_Verify_Server_Cert: No
                Last_IO_Errno: 0
                Last_IO_Error:
               Last_SQL_Errno: 0
               Last_SQL_Error:
1 row in set (0.00 sec)
设置完整后主从正常到主上解锁表让他可以写
mysql>unlock tables;
测试主从同步
主从的几个配置参数
主服务器上
 binlog-do-db=      //仅同步指定的库
 binlog-ignore-db= //忽略指定库
 从服务器上
 replicate_do_db=
 replicate_ignore_db=
 replicate_do_table=
 replicate_ignore_table=    //不想同步哪些表
 replicate_wild_do_table=   //如ahao.%, 支持通配符%
 replicate_wild_ignore_table=
测试
主上
# mysql -uroot -p
mysql> use ahao;
mysql>  truncate table db;
Query OK, 0 rows affected (0.00 sec)
 到从上 mysql -uroot -p
mysql> select count(*) from db;
+----------+
| count(*) |
+----------+
|        0 |
+----------+
1 row in set (0.00 sec)
测试删除表
mysql> drop table db;
Query OK, 0 rows affected (0.00 sec)
在从上查看

mysql> show tables;
+---------------------------+
| Tables_in_ahao            |
+---------------------------+
| columns_priv              |
| event                     |
| func                      |
| general_log               |
| help_category             |
| help_keyword              |
| help_relation             |
| help_topic                |
| host                      |
| ndb_binlog_index          |
| plugin                    |
| proc                      |
| procs_priv                |
| servers                   |
| slow_log                  |
| tables_priv               |
| time_zone                 |
| time_zone_leap_second     |
| time_zone_name            |
| time_zone_transition      |
| time_zone_transition_type |
| user                      |
+---------------------------+
22 rows in set (0.00 sec)